cakes · desserts

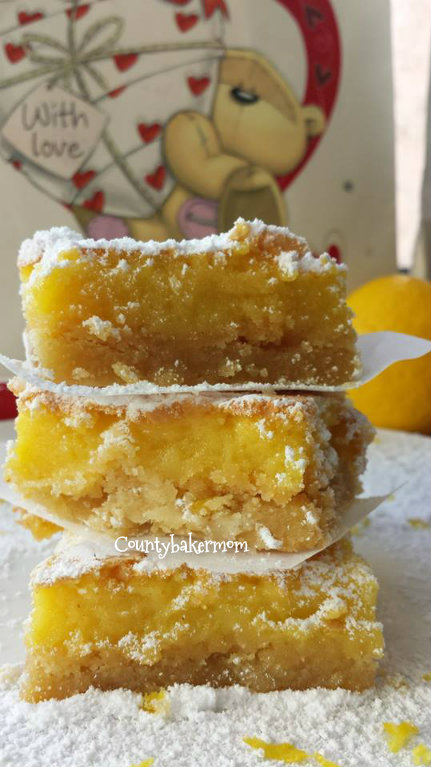
Luscious lemon squares…

I am always on the search for a new dessert or dish that I can try on. Luckily, as I browse the page of one of my favorite blogger she got a new post which really captures my heart. The way she describe her lemon bars is just really enticing that after reading it I want to bake it at that very moment. And so I search for more recipes and know more about this famous lemon bars. I admit I don’t know lemon bars and had never tried it.  I also found this..

lemon

proverbial phrase used to encourage optimism and a can-do attitude in the face of adversity or misfortune.

So yeah, when life will give me lemons I would definitely make it into luscious lemon bars :). I would say this recipe is just perfect for me not that tangy and it  melts in the mouth and it’s heavenly as Heart of Mary describe it in her post.

pizap.com13938505851001

LEMON SQUARES

Ingredients:
Note: I did some substitution on  some ingredients as it  is not available in my pantry.
For the pastry:
1 cup salted butter, cut into cubes ( I used unsalted butter and just added pinch of salt)
½ cup powdered/icing sugar
2 cups plain flour

For the filling:
½ cup plus 2 tbsp plain flour
1 ¼ tsp baking powder
½ tsp Salt
5 large eggs
1 ½ cup plus 2 tbsp granulated white sugar
1/3 cup lemon juice (about 2 large lemons)
1 tsp lemon extract( I used 1 tsp lemon zest )

zest of one lemon (optional, if you prefer it to be more tangy) I didn’t put mine more zest as I don’t like very tangy.
powdered/icing sugar for dusting

Procedure:

1.  Preheat oven to 180 deg C (350F)  Line a 9×13 baking pan with baking paper. (I use a rectangular springform pan which makes it so easy to remove the lemon squares.)
2.  In a medium bowl, mix together all the ingredients for the pastry until it forms a dough.  Gather dough into a ball.
3.  Press the dough onto your baking pan. Spread it as evenly as possible.

4.  Chill in the fridge for about 15 minutes then bake in the oven for 25 minutes.  After the pastry is baked, take it out but leave the oven on.
5.  While the pastry is baking, prepare your filling.  In a small bowl, whisk together the flour, baking powder and salt.
6.  In a large mixing bowl, beat the eggs until foamy, starting from a low speed gradually increasing to high.
7.  Slowly add in the sugar.  Beat the mixture until it is very light yellow in colour and it has quadrupled in volume.
8.  With mixer on lowest speed, add in the lemon juice, lemon extract and zest, if using.  Lastly, add in the flour.  Mix only until everything is combined.
9.  Pour the filling on top of the warm, baked pastry.  Place pan back in the oven, lower the temperature to 160 deg C (325F) and bake for about 30-40 minutes or until the top springs back when lightly touched.  Baked filling should be very light golden brown.
10.  Move pan to a wire rack.  Let cool completely before slicing into squares.  Dust top generously with icing sugar.
pizap.com13938507155272
pizap.com13938447798881
(unnamed) · desserts

Velvet cupcakes

1927041_10203131593271590_1061329754_n

Yes! I just call mine velvet cupcakes instead of the popular red velvet cake and why? simply because it is not that red to be called red velvet cupcakes 🙂 kidding aside. Anyway, it is still the red velvet cupcake but I opted not to add more red food coloring.  Sometimes , if I have this recipe to try on I have this attitude not to follow what the recipe is asking for. So with this recipe I did not put the required amount of food coloring. I was not after the red color after all but of course the outcome and  taste of this velvet cupcakes 🙂 .I was not disappointed the cupcakes and cream cheese frosting has just the exact amount of sweetness:)

Velvet Cupcakes

Ingredients:

2 1/2 cups sifted cake flour*
1 teaspoon baking powder
1 teaspoon salt
2 tablespoons unsweetened cocoa powder
2 oz. red food coloring (two bottles)
1/2 cup unsalted butter, softened
1 1/2 cups sugar
2 eggs, at room temperature
1 teaspoon vanilla extract
1 cup buttermilk, at room temperature
1 teaspoon white vinegar
1 teaspoon baking soda

Procedure :

1. Preheat oven to 350 degrees. Line two 12-cup muffin tins with cupcake papers.

2. Sift together the cake flour, baking powder, and salt into a medium bowl; set aside.  In a small bowl, mix food coloring and cocoa powder to form a thin paste without lumps; set aside.

3. In a large bowl, using a hand mixer or stand mixer, beat butter and sugar together until light and fluffy, about three minutes.  Beat in eggs, one at a time, then beat in vanilla and the red cocoa paste, scraping down the bowl with a spatula as you go.  Add one third of the flour mixture to the butter mixture, beat well, then beat in half of the buttermilk. Beat in another third of flour mixture, then second half of buttermilk. End with the last third of the flour mixture, beat until well combined, making sure to scrape down the bowl with a spatula.

4. In a small bowl, mix vinegar and baking soda.  Yes, it will fizz!  Add vinegar mixture to the cake batter and stir well to combine. Using an ice cream scoop, fill cupcake cups with cake batter (they should be 2/3 – 3/4 full).  You may not fill all the cups, I ended up with 20 cupcakes.  Place muffin tins on the middle rack of a preheated 350 degree oven.  Bake for approximately 20-22 minutes, rotating pans halfway through. Cupcakes are done when a toothpick inserted in the center comes out clean.

5. Cool the cupcakes in their tins on a wire rack for 10 minutes then remove and allow to cool completely before frosting.

pizap.com13938471689101

CREAM CHEESE FROSTING
(Will frost about 20 cupcakes)

Ingredients:
1 bar (250g) cream cheese, cold, cut up into small cubes
1/2 cup butter, room temperature
1 teaspoon vanilla extract
2 cups powdered/icing sugar, sifted

Procedure:

In a medium bowl, beat the butter for a few seconds.  Add in the cubed cream cheese and vanilla extract.Beat until combined.

Add powdered sugar in 3 additions.  Beat only until the mixture is smooth.  Over beating will make the frosting go soft.

Frost the cupcakes and decorate the way you want it 🙂

1903388_10203131593151587_1341511596_n


pizap.com13938474524891

The recipe is from  Pinch My Salt.

The frosting is from Heart of Mary.

(unnamed) · Filipino delicasies

Let’s get the ball rolling for 2014!

First of all I wanna greet all of you a HAPPY HAPPY NEW  YEAR!!!! May 2014 be  a year of health and happiness,a year of  wealth and wisdom, a year of peace and prosperity, a year of glee  and glow, and of course a year of LOVE & Laughter for all of us!!:)

I miss the blogging world but the last few months of last year was just too busy for me.  There are lots of parties and gathering and so my kitchen is also busy from cooking to baking:)Anyway, the first   recipe that  I  would be posting for 2014 is the one that I have baked for a the celebration of 10 years of Filipino-Irish Community here in Ireland. Eating these cupcakes gives us a nostalgic feeling, could bring back wonderful  memories of childhood. Cheese  cupcakes  has  always  been  a part of my student  years and even when I started working this has still been my favorite cupcake.

pinoy cheese  cupcake
pinoy cheese cupcake
Cheese Cupcakes

Prep Time: 15 minutes

Cook Time: 25 minutes

Yield: 18 Servings

Ingredients

  • 1-3/4 cups flour, sifted
  • 2 teaspoons baking powder
  • 1/4 teaspoon salt
  • 1/2 cup butter
  • 1/2 cup sugar
  • 2 eggs
  • 1 can (14 ounces) sweetened condensed milk
  • 1/2 cup quick-melt cheese, shredded
  • 1/2 cup cheddar cheese, shredded

Note: I used my favorite  Hochland  Gouda cheese in this recipe. It’s very creamy  and yummy just like Eden Cheese of Philippines:)

Instructions

  1. In a large bowl, combine flour, baking powder and salt.
  2. In a medium bowl, beat butter, sugar and eggs.
  3. Beginning and ending with flour mixture, add flour mixture in thirds and 1/2 of sweetened condensed milk in between. Beat at low speed with every addition.
  4. Add quick-melt cheese and stir to combine.
  5. Using a scoop or spoon, fill paper-lined muffin cups to 3/4 full. Top with cheddar cheese and bake in a 350 F oven for about 20-25 minutes or until toothpick inserted comes out clean and top is golden. Allow to cool.

Thank  you  Kawaling Pinoy for sharing the  recipe 🙂

Japanese foods · viands/main dishes

crunchy tonkatsu

I still have panko breadcrumbs leftover so I decided to try this Japanese food Tonkatsu.  It is crunchy, on the outside and tender on the inside. My husband and  son LOVEs it! Best serve with Tonkatsu sauce or Barbecue sauce. Enjoy:)

pizap.com13779472708985

Ingredients:

10 pcs PORK LOIN STEAK or PORK CUTLETS, boneless
salt & pepper to taste
1 and 1/2 cup all purpose flour
2 beaten egg
1 1/2 cup Japanese bread crumbs
cabbage, shredded thinly
cooking oil for deep-frying
commercially available Tonkatsu or Barbecue sauce

lemon wedges for garnishing

Procedure:

Score the fat of the pork chops to prevent from curling. Lightly salt and pepper the chops on both sides, then dredge in flour. Shake off any excess flour, dip in beaten egg. Next press the chops firmly into the breadcrumbs making sure that all surfaces are well coated. Place them on a sheet pan covered with parchment paper and refrigerate for an hour before using.

Deep-fry the porkchop in oil, turning once or twice until cooked through and golden brown, approximately 4-5 minutes. The coating should be quite crisp. Drain the excess oil in paper towel.

Serve Tonkatsu or barbecue sauce with fried pork cutlet.

pizap.com13779473095296

Serving Suggestion:Place shredded cabbage over half of a warm serving plate. Place the porkchop on top of the cabbage toward the center of the plate. Serve the sauce in a separate small dish for dipping. Garnish with lemon wedges.

recipe from  Recipe TV

(unnamed) · desserts

quezo chiffon cupcakes

During one of the Filipino gatherings  I tasted this kind of dessert that really captured my taste buds. From then on I fell in love with it and tried to search for a  recipe. I tried asking the one who made it but I think she doesn’t want to share 😦 . I have found a recipe from sweetcherriepie.com and another one from HerWord.  But for now  I am sharing  the recipe from sweetcherriepie.  The cheese really goes  well with the butter icing and it really compliments the flavor of the cupcake too.It’s yummy and my Irish friend really loves it ☺

pizap.com13756141597742

Ingredients for cupcakes

1/2 cup plus 2 Tbsp of self raising flour
1/4 tsp salt
1/4 cup caster sugar
3/4 tsp baking powder
2 eggs, separated
1/4 cup water
1/4 tsp vanilla extract
1/8 cup oil
1/4 tsp cream of tartar
2 Tbsp sugar

Butter icing
1/2 cup unsalted butter
1/2 cup icing sugar or adjust according to your preferred sweetness 

grated cheese for toppings or quezo de bola if you have one.

Procedure:

1.  Preheat the oven to 180’C and line 12 hole mini muffin pan.
2.  Place in a large bowl, flour, salt, sugar and baking powder.  Using a whisk, stir until there are no lumps.  Make a well in the center and add the egg yolks, water, vanilla and oil.  Blend till smooth.
3.  In another bowl, whisk the egg whites and cream of tartar until soft peak form.  Gradually add the 2 tbs of sugar and continue beating till stiff.
4.  Fold a third of the egg whites into the cake mixture then gently fold in the rest.  Do not over mix the batter.
5.  Fill the cupcake cups 3/4 full and bake for 10-12 minutes.  Cool completely on a wire rack.
6.  Make the butter icing by combining the butter and icing sugar in a bowl and mix till light and fluffy
7.  Once the cupcakes are cooled, spread the butter icing on top and sprinkle with the grated cheese.

Next time I’ll try HerWord recipe for comparison ☺

pizap.com13756142218883

pizap.com13756142757864

desserts · Uncategorized

Vanishing cookies…

I baked this cookies the other day, somehow I want to make myself busy as I’ve been down this past days .  I miss baking too and I still have lots of leftover oatmeal so I then used the recipe that I got from  MARUISM. Cookies are not too sweet and I must say I like this one better than the first oatmeal cookie I have baked.

pizap.com13756125868511

 VANISHING OATMEAL RAISIN COOKIES

Preparation Time: 20 minutes
Cook Time: 8 minutes
Ingredients:

1/2 cup, plus 6 tablespoon butter, softened
3/4 cup firmly packed brown sugar
1/2 cup granulated sugar
2 eggs
1 teaspoon vanilla
1 1/2 cups all purpose flour
1 teaspoon baking soda
1 teaspoon ground cinnamon(I used only half of teaspoon as I don’t want the cinnamon will overpower the flavor of the cookie)
1/2 teaspoon salt (optional)
3 cups Quaker Oats (quick or old fashioned, uncooked)
1 cup raisins

Procedure:

Heat oven to 350°F. In large bowl, beat butter and sugars on medium speed of electric mixer until creamy. Add eggs and vanilla; beat well. Add combined flour, baking soda, cinnamon and salt; mix well. Add oats and raisins; mix well.

Drop dough by rounded tablespoonfuls onto ungreased cookie sheets.

Bake 8 to 10 minutes or until light golden brown. Cool 1 minute on cookie sheets; remove to wire rack. Cool completely. Store tightly covered.

pizap.com13756128446532


desserts · Filipino delicasies

out of the blue..

I  bake this bibingka out of the blue… I was just doing my daily routine that day and then suddenly I have this urge to bake something . So I prepared all the ingredients and  whisk everything,bake and voilà .. ☺♥☺

bibingka


Bibingka Recipe

2 cups rice flour
1/2 cup glutinous rice flour
1 tablespoon baking powder
1 teaspoon salt
3 eggs
3/4 cup sugar, more for sprinkling on top of the cakes
1-1/2 cup coconut milk
1/3 cup butter, melted, and more for brushing cakes
pieces banana leaves
salted egg, sliced
grated coconut (optional)
grated Edam or cheddar cheese (optional)


Preheat oven to 350 degrees F.

Line  pans or ramekins with banana leaves or wax paper .

Whisk together rice flour, glutinous rice flour, baking powder, and salt in a bowl.

Beat eggs in a bowl. Add sugar and beat well. Add butter. Alternate adding flour and coconut milk. Beat until just blended. Do not over beat the batter.

Divide the batter equally into the  pans.  Lay slices of salted egg on top and set the cakes on the top rack of the oven. Bake until the cake is cooked through,  20 to 25 minutes.  Turn the broiler to low and broil the cakes to brown the top for about a few minutes. Watch cakes carefully to keep them from burning.

Brush the cakes with butter and sprinkle with sugar, grated coconut, and grated cheese. Serve warm.

 Jun-Blog recipe.

pizap.com13728479347222


Note: I want my cheese melted so I put mine 3 minutes before I take out my bibingka from the oven. My husband loves it very much that he told me to sell it to our Filipino friends ☺ I’m a happy baker♥♥♥

bread · desserts

Soft & cheesy

It’s summertime  and happy days are here again. This is the best time to have fun in the beach . Time to go out, play outdoors and do everything that can be done under the sun.  Yes, I’ve been away from the house this past weeks so I did not have the chance to bake or cook something to share  here.  I just want to enjoy the sunny days as it won’t last. But yesterday was not a good day so I decided to try this recipe that I have been eyeing for a while now.  This kind of  bread reminds me back home and bring back some memories during my younger years. I used to buy this kind of bread in our local bakery. We call it cheese bread. I can recall the creaminess of the cheese inside the bread and that’s one I wanted to achieve in making this Cheese Rolls and it didn’t fail me. I am very happy as the bread came out soft,creamy and cheesy. cheese rolls


INGREDIENTS:

1 tablespoon yeast
1 tablespoon sugar
1/3 cup lukewarm water

For the dough
2 eggs
4 egg yolks
1/3 cup water
1/2 cup melted butter
4 1/2 cups all-purpose flour
1/2 cup sugar
1/2 cup powdered milk
1 teaspoon salt

softened butter for greasing and spreading
500 grams Cheddar cheese, sliced into 40 sticks
sugar for sprinkling


PROCEDURE:

1  In a small bowl, combine yeast, sugar, and lukewarm water. Let stand for 5 minutes to let bubbles form on top.

2  In a large bowl, mix together eggs, yolks, water, and butter. Pour in the yeast mixture and mix.

3  In another large bowl, mix together flour, sugar, powdered milk, and salt. Pour in the liquid mixture; mix. (Dough will be quite sticky.)

4  Grease your work area with butter. Knead the dough until smooth. (To check for the right consistency, dough should be easily stretched into a thin film without breaking.)

 Form dough into a ball and place in a greased bowl; cover with plastic wrap. Let dough rise at room temperature until it doubles in size, about 1 1/2 to 2 hours.

 Remove plastic and punch down dough to release air.

 Form dough into a log and divide equally into 40 (50-gram) pieces.

 Using a rolling pin, flatten each piece; spread with softened butter.

9  Place a cheese stick in the center of each piece; roll. Pinch ends to seal.

10  Arrange rolls on a greased baking sheet and proof until they double in size. Bake at 325ºF for 15 minutes.

11  Brush cheese rolls with butter and sprinkle with sugar.


Time- and energy-saving tip  Make it effortless! In Step 4, you can also use an electric mixer with the dough hook attachment to mix and knead the dough. To get a darker crust, brush top with milk before baking.

Recipe from Yummy.ph

cakes · desserts

A sweet treat

Yesterday, my son keeps telling me that he wants to eat chocolate cake apparently I ran out of milk. Then I remember brownies doesn’t need milk and  so  for being good in play school I made him this sweet treat.

moist brownies
moist brownies

MOIST BROWNIES

Ingredients:

2/3 cup butter, cubed
4 ounces bittersweet chocolate, chopped
1 cup granulated sugar
2 pieces eggs
1 teaspoon vanila extract
3/4 cup all-purpose flour
1/3 cup cocoa powder
1/4 teaspoon salt
Directions:

1. Preheat oven to 325F. Grease and line an 8×8 inch square pan.

 Place butter and bittersweet chocolate in a medium bowl and set it over a pot of simmering water. Gradually melt the butter and chocolate. Stir occasionally. Remove from the heat once completely melted. Set aside.

3  In another mixing bowl, place sugar, eggs, and vanilla. Mix gradually until sugar is melted.Add the chocolate mixture and stir with a wire whisk.

4  In a separate bowl, whisk together flour, cocoa powder and salt.Gradually add the flour mixture in the egg mixture. Whisk just until combined. Do not over beat—stop mixing as soon as ingredients look well combined and no lumps are visible.

 5.Pour batter onto prepared pan. Bake for 25-30 minutes.

6. Cool completely on a wire rack before slicing.

moist brownies
moist brownies

Recipe from Gourmet Goodies

chinese/dimsum · desserts

Cravings

It’s been raining for a week even though it’s summertime here already. I suddenly miss Philippines 😦  and the food that I love eating there  during rainy days like   mami(noodle soup) and pair it with siopao (steamed buns) .  I really want to cook mami but I don’t have available noodles so I ended up making some steamed buns. For the filling I just used roasted chicken leftover that my husband bought from the shop. I just flaked the chicken and  cooked it  in adobo style.

steamed buns(siopao)

For the yeast dough recipe, here is  the link Jun-Blog.

1 1/2 tsp instant dry yeast
3/4 cup lukewarm water
2 Tbsp canola oil
2 Tbsp sugar
2 tsp baking powder
3 cups (12 1/2 ounces) flour

Put the yeast in a small bowl, add the water and set aside for 1 minute to soften. Whisk in the oil to blend and dissolve the yeast. Set aside.

Combine sugar, baking powder and flour in a large bowl. Make a well in the center and pour in the yeast mixture.  Slowly stir with a wooden spoon, moving from the center toward the rim, to work in all the flour.  Keep stirring as a ragged but soft dough forms. Then use your fingers to gather and pat the dough together into a ball. Transfer to a clean work surface and knead for about 5 minutes.  You should not need additional flour if the dough was properly made.  Keep kneading until the dough is smooth and slightly elastic.Press your finger into the dough and it should spring back with a slight indentation remaining.

Place the dough in a large bowl that has been lightly oiled. Cover with plastic wrap and put it in a warm, draft-free place to rise such as an oven and let it sit for around 45 minutes until the dough has nearly doubled.  You can refrigerate the dough if you do not need it right away but make sure that it is covered well with a plastic wrap.

Lightly dust your clean work surface with flour.  Cut the dough in half and roll into a foot-long log.  Cut the log into eight pieces.

Roll each piece into a ball and flatten each piece gently into a small disc using your palm. Using a small rolling pin (either a 1-inch wooden dowel or the end of a wooden spoon like what I used, would do) roll the edges and only the edges. There should be a small bulge at the center of the dough, which the Chinese calls the belly.Place a generous tablespoon of your  filling in the center of the dough, right on the belly. Wrap the filling by pressing and pulling the edges of the dough.Gather and pull the edges up and twist the top to fully cover the filling.

Cut 2-inch square wax paper sheets and use these to line the bottom of each bun before steaming them. Steam up to 4 buns in an 8-inch steamer. Make sure that there’s around a 1 to 2-inch space in between buns inside the steamer.

Boil water in your wok or a large pan and place the steamers with the buns in your wok or pan. Steam for around 15 minutes. Make sure that the water does not come in contact with the buns.Remove the lid before you turn off the heat to avoid condensed water from dripping back to the buns. Continue steaming the rest of the batch.

siopao
siopao